|
A DIY SEMI-AUTOMATIC SOLAR STILL&A DIY FULLY AUTOMATIC SOLAR STILLby Tom Burns |
|

|
|
A DIY SEMI-AUTOMATIC SOLAR STILL&A DIY FULLY AUTOMATIC SOLAR STILLby Tom Burns |
|
|
|
With all the concerns in recent years about the various chemicals in our water and foods that could add up to potential health problems there may be quite a few people that would like to have a small supply of perfectly pure drinking and cooking water. Even though our domestic water is generally declared safe, it usually abounds with foreign stuff in small amounts that are supposedly safe, and sometimes bottled water is questioned. Distilled water is perfectly pure. Some people worry that its lack of minerals is not good. But we get our needed minerals mostly from food, not water. Anyhow, each water source has a different mineral makeup, a lot of which we don’t need, including such stuff as lead and arsenic in low concentrations but acceptable in the domestic standards. This article is intended to give you enough information on how to build a simple type solar still. Stills are not practical everywhere, but your location may be okay and you may even be able to make one that works automatically. More about this later. Basic Solar Still:
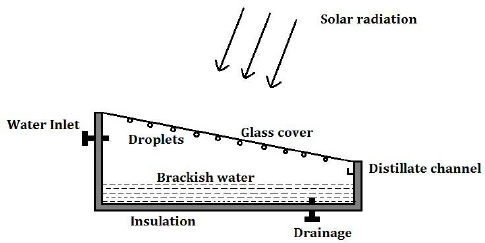
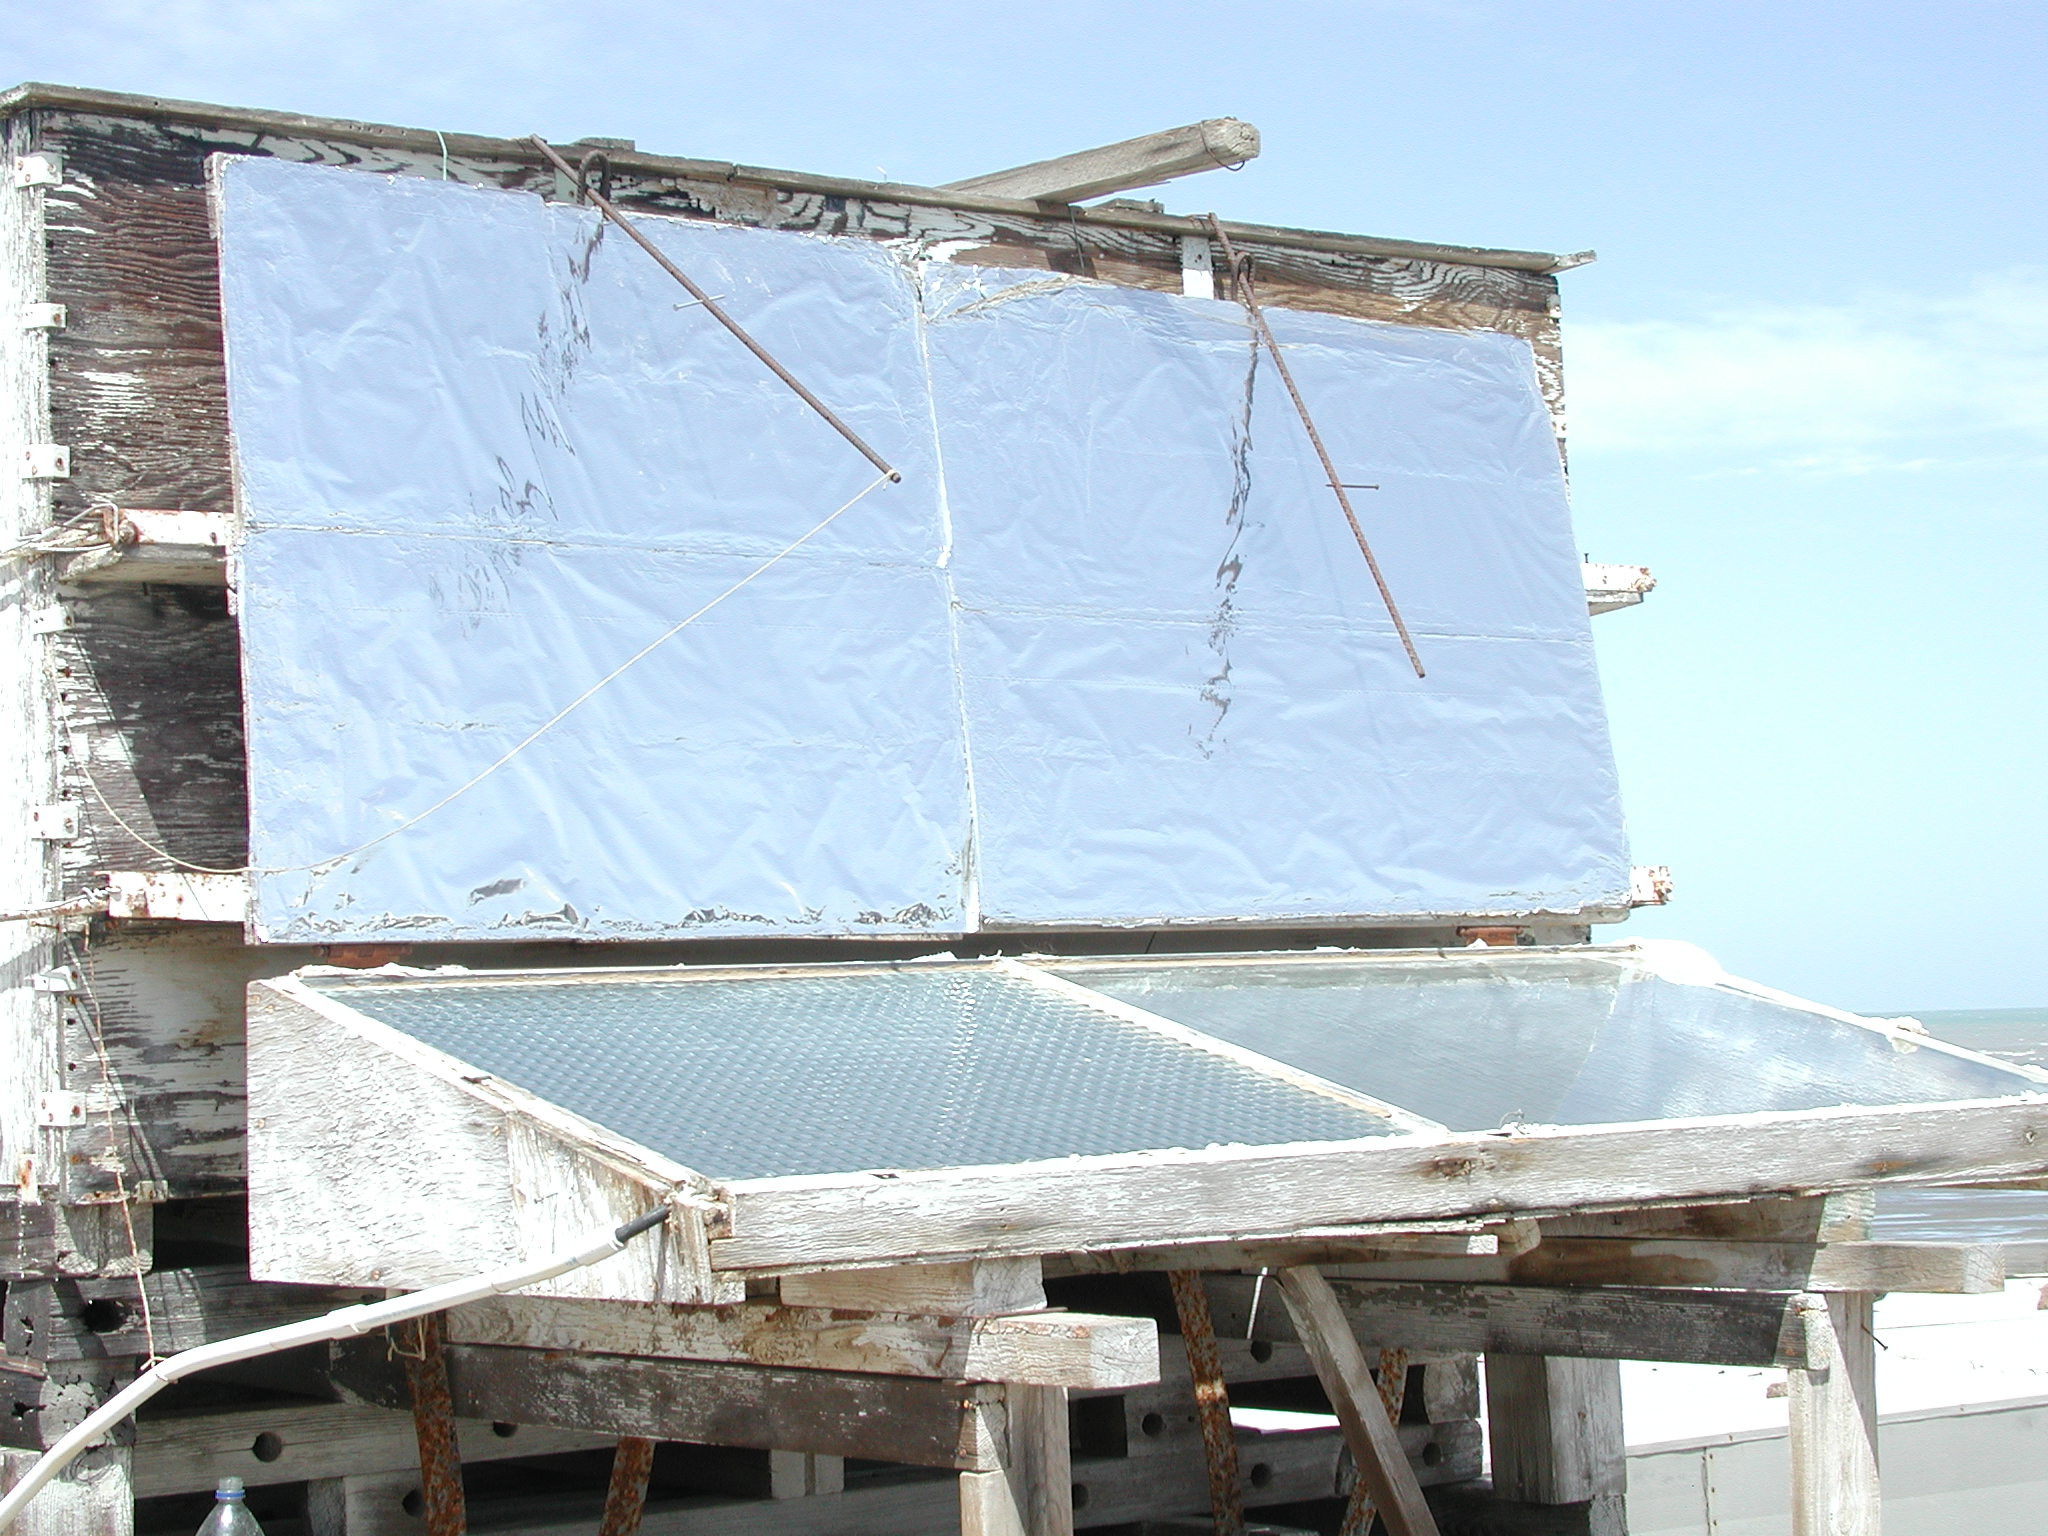
The type of still described here is just an insulated box, the top of which is a slanted window through which the sun shines on feedstock water in a pan. The bottom of the pan is black that collects heat from the sun and heats the water, which then makes a hot vapor that rises up to the window. The slanted window, exposed to the outside air, is cooler, so the vapor condenses into distilled water on its underside and trickles down into a collecting trough. All parts of the still including the bottom are insulated to keep the feedstock water as hot as possible, because the rate of condensing depends on the difference in temperature between the hot water vapor and the window. This is not the most efficient type of still but is not difficult to build and is relatively inexpensive compared to commercial ones. The feedstock can be poisonous, brackish, bacterial contaminated water, sea water, or even succulent vegetative material. But the resulting distilled water is pure because nothing from the feedstock is carried up with the hot water vapor that is generated. As the feedstock water is used from the pool it must be replaced. The contaminants in the feedstock remain in the pool and would increase in concentration and need to be diluted or flushed out periodically. With seawater as a feedstock twice the amount of the yield would be needed to be added each day, forcing some of the old concentrated feedstock out the overflow, to keep it diluted enough from forming salt crystals in the pool, which would reflect sunlight back out. But for using domestic water as feedstock this is no big problem. Domestic water usually does not contain high concentrations of minerals and would not need to be diluted or replaced more often than weekly, monthly or longer, depending on its mineral content. Therefore, if the feedstock pool is replenished by the domestic source through a float valve, the still would work automatically between pool flushings. Float valve model # 4180 of Home Depot’s Evaporative Cooler (swamp cooler) looks like it would work. One should be warned, however, that for other uses, whatever the feedstock is used, it must be water based. No petroleum products or alcohols or other products with a vapor pressure lower than water can be allowed in the still. There are few of them, one being ethanol (drinking alcohol) which would come from fermented fruit or grain and would contaminate the distillate with alcohol. Following is a picture of a still I built forty plus years ago and which is still working automatically with a distilled water faucet at the kitchen sink. It is located in Baja Calif. about 100 miles south of the border on top of a patio next to a 4' x 4' x 8' tank which is our water supply. The tank is replenished by local small tank trucks with water of good quality from a distant well but of questionable drinking quality by the time it gets to us. Thus the still. I use this as feedstock. Originally I had no idea of making the still work automatically, but quickly realized that my daily adding to the feedstock was increasing the mineral content in the pool only very slowly. With the still right next to my water tank it quickly dawned on me to just run a pipe from the tank to the still with a float valve inside the still to keep the pool supplied automatically. Flushing or diluting the pool would be needed only occasionally. So then I ran the still output into a small tank and from there piped it into the kitchen to a faucet by the sink. Voila! Instant distilled water! The size of my still pictured here (2-1/2' x 6'-9" = 17 square feet) was determined by the pan which is the bottom of an old stainless steel lab sink that was given to me. In building the still I knew the general principles that made a solar still work but hadn’t researched adequately. Thus, I made a couple of mistakes that probably reduced its efficiency. One was the use of fairly heavy glass, which I had on hand. This slows down the heat transfer for the condensation process. How much effect this has, I don’t know. The other is that I had enough sense to cover the bottom of the bright stainless steel pan with dark sand to prevent reflecting sunlight back out of the window instead of heating the feedstock, but I should have painted it black to absorb the sun’s heat more efficiently. Again, I don’t know what effect that had. The still worked well enough to provide what we needed, and I let it be. I built a cover for the still for protection from rocks thrown by kids when we weren’t there, hinged at the top. I then discovered that reflectorizing the underside of this cover with aluminum foil and holding it at the correct angle to reflect more sunshine into the still significantly increased yield from about 5 liters per day to 7. See table 1, and compare April 10 and 11 with Apr. 2 and 3. The reflector should be even more effective in the shorter days when the sun is lower and even more so at higher latitudes. However, a reflector raises a very serious wind problem. Unless you have a very firm anchor like a wall or like the water tank behind mine, a reflector may not be feasible. Best then to make the still large enough to begin with. But at a location like Boston at latitude 42.3 degrees, a reflector could direct more sunlight into the pool than the direct sun itself in November or December. The reflector angle in this case would be around 20 degrees from vertical. The reflector needs to be changed, perhaps monthly, which works out to be from nearly straight up in the summer to as much as 22 or 23 degrees from vertical in the USA in the winter depending on your latitude and the month. Use a newspaper on the window around midday to see where the reflection is. Notched or pinned arms, hinged from the bottom or from a strong base above would be needed to hold the reflector at the correct angle. The reflector could be used only in the winter, or a smaller one or even larger one could be used; use your imagination. The big question is how large a still would you need to supply how much water you want. Solar stills don’t work well everywhere. They need ample sunshine. The yield is directly dependent on how much heat from the sun is absorbed in the pan in a day, which is affected by season (length of day) and latitude, both of which affect elevation of the sun, general clarity of the atmosphere, and weather (clouds). There is a dearth of information on the performance of solar stills in various locations. All I can say for sure is that they perform well in areas like Arizona and desert areas of southern Calif. They should perform somewhat similar to solar panels in other areas. Table 1 shows the yield of my still in ideal conditions in good day length which would probably be similar in Arizona and surrounding areas of the SW. Yields in the winter are significantly less than Table 1, but I am sorry I never recorded them. I have no idea of yields in other areas where sunshine may not be so abundant. There is some literature published which states that a still of this type should yield about 0.1 gallon of per square foot per day, but this doesn’t say what time of the year or what latitude or general location. The bottom line is that daily yield is directly dependent on the amount of sunshine that gets into the pan in the day. If you are thinking of the possibility of an automatic still and live in an area other than the SW where you cannot find information as to the size of a still that would meet your needs or whether one would even be feasible, it might behoove you to first build a cheap-o small one to get factual information on yield in your area before investing time and resources in a large one.. The sketches shown are for the frame of a large one like mine but most details would also apply to a small one made of plywood only, without a frame. Actually you could make a temporary one out of a sturdy cardboard box to be used only for short periods to sample yield at various times of a year. Cut the box of 1-1/2 sq. ft. or more size into the shape of a still. On a plywood base somewhat larger place a 1" piece of polyfoam insulation that fits snugly inside the box. Line the inside of the box with polyfoam and then reflective aluminum wrapping. For a window use clear polyethylene plastic scratched on one side with sandpaper or scouring pad (a tedious job) to make it wetable. Water balls up in tiny droplets on smooth plastic falling off or reflecting sunlight back out. Do not use vinyl, it may be toxic. A pan can be made by draping black polyethylene (plastic refuse bag) over a fence of 1-1/2" or narrower sheet metal or thin plywood around the inside perimeter of the box. Make a strip of wood glued to the inside of the front for attaching a trough as shown in the sketch. Use contact cement for attaching the window to the trough piece. All surfaces and edges of the cardboard must be well coated with good paint. Any raw cardboard subject to vapor or rain will destroy that part of the still. Small strips of wood attached to outside edges of the cardboard may be needed to keep them straight. Put weather stripping around the bottom and set the box on it. If it doesn’t fit well, use duct tape. If you already have glass available, make a frame for it to fit inside the box, or make the whole thing out of plywood. Note that in the picture of the still the back is vertical. An improvement for a permanent still would be to make it slanted so as to be at right angles to the 12 degree slanting window. This would make s bit larger pan (more sunlight) for a given size window and make easier construction for the frame pieces holding the window for either a large or small still. The 12 degree slant (2-1/2" in 12") for the window is necessary for the distillate to all run down a glass undersurface without any of it dripping back into the pan. Other window materials such as Teflon, Plexiglas, or polycarbonate may need a different angle and should be tested first. A metal pan would be better, and very desirable for a larger permanent still. A custom made one would be expensive, but pieces of aluminum flashing or sheet meal from the local recycler overlapped and cemented with epoxy could be fashioned into a pan. Clear polyethylene, scratched on the underneath surface by fine sandpaper to make it wetable, could be used for the window for the small still instead of glass, but may not last very long. Don’t use vinyl, it may be toxic. Also, do not use automobile glass or other glass containing a lot of iron. They look dark green, looking at them edgewise. Ordinary window glass will look a lighter green but is okay. Old soda glass, looking yellow edgewise, is better. The thinner the glass, the better. For large stills glass, not necessarily all in one piece might be found from old windows or large low value pictures. One way to make the small sized still would be to make it all out of plywood without a full frame or door, using only parts F, C‘s, and G (with 3/16" grooves to hold the window), assembling everything together including the bottom but without the pan. Then make a horizontal saw cut about 2 inches up above the bottom all the way around, cutting the still into two pieces so that the top half can just be lifted up or hinged. This will ensure a good fit between the two halves even if the saw cuts are not straight. A strip of weather stripping on the cut surface and tight fitting hinges on either the front or back and tight latches will eliminate air leaks. A couple of tabs glued to the outsides will keep the two parts aligned if there is any warping of the plywood. You might want to use something thicker than plywood for the front piece. Another way would be to just rest the whole superstructure on the bottom piece to make the seal there. The bottom insulation and pool would stay with the bottom. In either case the drain would be in the bottom. For parts F, C, and G, rather than make 45 degree angle joints like a picture frame, cut each end of the pieces to ½ depths, overlap them and glue to make a strong rigid joint. The 1" polyfoam insulation is to be fully glued to each wall so that no air can get between them. All the interior walls should then be lined with heavy grade household aluminum wrapping. A strip of thin stainless or galvanized iron, aluminum or copper about 1-5/8" wide should be bent lengthwise into a “W” shape (probably a job for a sheet metal shop) to form the seat of the lower end of the window and collecting trough as shown in the sketch. The outside edge of the trough should clear the window by at least 1/4"to prevent large drops of distillate from touching this edge and falling back into the pan. Seat the trough with a thin ribbon of silicone caulk and tack it down with small wire brads. Bore a hole through C and install a tube from the trough for the distillate outlet. Seal tube into trough with silicone. A large still can be made with access to the pan either from the back or from the top. The sketches are for access from the back, because that is easiest to build. Access from the top requires a separate frame to hold the glass. Probably the best way to put a large still together is to make the two end frames first: A, B, C, and D. Make B and D of one frame bout 1/4" or 3/8" longer in height than the other end for each 4 ft. of width of still so that the trough in G will have a slope for the distillate to flow. I made these pieces from 1" square stock so that 1" thick insulation fits snugly in them. The size of block D must be made to cause the glass groove in C to meet that of G. After assembly of the whole frame each end is covered with a piece of 5/8" or 3/4" plywood. Then attach the bottom. The top and bottom back rails E and F should be at least 1-1/2" deep for E, or maybe more for a still more than 4 ft. wide, and 2" or more for F, assuming that the back is hinged at the bottom on F. The depth of G would work out to be about 3-1/4" for a 1-1/2" pan at the small end. Cement a strip of insulation on the inside of G. The kind of wood to use for frame construction is up to you. Light and medium density woods give some insulating value, particularly light wood. But heavy dense hardwood has low insulating value. What difference this would make, I do not know. Although I have shown 1" as thickness for all frame parts, a thicker G would add strength in a large still. G should taper a bit in height from one end to the other for trough flow. Bore pilot holes to prevent splitting by the screws, and glue joints. Latches of some kind or screws may be needed at several points for a plywood back door to ensure a leak-proof fit. Polyfoam is probably the best kind of insulation to use. It must be glued to the inside of the back door and side panels so that air does not get between the insulation and panels, or its purpose would be destroyed. Finding a glue that doesn’t shrink the polyfoam might be a problem. The bottom of the still depends on the size and how it is supported; I suggest a 3/8" minimum plywood bottom for use on a flat fully supported area, but reinforcing or thicker plywood for large or only partially supported bottom to prevent sag may be needed. Water is heavy. Use material for a cover/reflector (if used) to suit your judgement about expected wind conditions. More than one holding arm may be needed for big stills or very windy areas . FULLY AUTOMATIC SOLAR STILL In recent years I have developed a fully automatic solar still. It not only replenishes water to be distilled but eliminates the brackish water that has becomes more and more concentrated as water is evaporated from the water supply and the mineral content in the water increase. If you are interested and would like more information, please contact my daughter at napiligal@gmail.com. |
|